Wednesday, June 6, 2012
THANK YOU
I would like to than hour teacher, Peter, for a great year. I know we were a crazy class, but we really learned a lot, and outside of class, we talked about how much fun we had and how we looked forward to it. You are very patient with us and made the class worth it. THANK YOU.
Final Project
1. We chose sturdy objects (i chose hard plastic cups)
2. We made wooden bases using jigsaws, then attached our objects to the bases using drills and dowels
3. We covered the pieces with wire, a lot of wire, so there was no movement
4. Covered wire with strips of plaster-y gauze-y strips
5. Cover that layer with burlap dipped in a fresh batch of plaster
6. Use hardening plaster to build onto piece
7. When it's dry, use sandpaper to shape the piece
8. PAINT IT (the picture of it painted will go up when I finish painting it)
Vending Joy Exhibit
So, we ended up covering the Vending Joy model with plastic necklaces and feathers and such. This references jingle trucks, as well as lent.
And we put it in the art building, with bottles glued onto bottom and floral decorations. We also spent a class hanging a smaller sculpture (made from chicken-wire scraps and leftover beading) above the Vending Joy box.
And we put it in the art building, with bottles glued onto bottom and floral decorations. We also spent a class hanging a smaller sculpture (made from chicken-wire scraps and leftover beading) above the Vending Joy box.
Thursday, March 8, 2012
Throwback to First Semester
These are past projects that the class has done:
1. We learned how to tie complicated knots. This is the Clove Knot
 This is the first project of the year. We had to use wood scraps and a jigsaw to make notches in the wood so that pieces fit together:
Here is the finished product:
As a side project, we were asked to draw something on a poster board, and then incorporate string to give the drawing a 3-D quality:
1. We learned how to tie complicated knots. This is the Clove Knot
 This is the first project of the year. We had to use wood scraps and a jigsaw to make notches in the wood so that pieces fit together:
Here is the finished product:
As a side project, we were asked to draw something on a poster board, and then incorporate string to give the drawing a 3-D quality:
This was the first step of the armature project. We had to take pictures of our front and side profiles. Then glue the printout photos to panels notched wood. From there, we put the posterboard and wire. Then the papier-mâché:
Research for Vending Joy
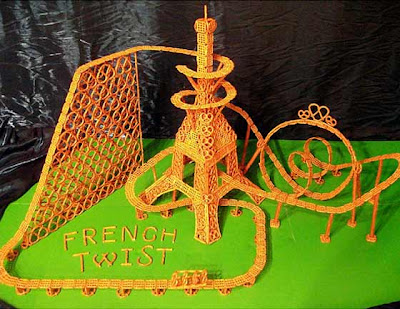
So, here is research for the Vending Joy project. The dollar coaster one is essential because it shows to to make a wall of pretzels, and shows me that curves are possible.
This gummy bear one is just cute. But it illustrates the possibility of layering using the flirt gummies.
The Watermelon and butterfly ones are my favorites, and they shows carving possibilities. Although in this project, carving is not an option, I want to use this style in an incoming project.
This one is really cool, with the hot-glue coming off the wall. Now I want to use hot-glue as a major part of my project. I can use it to build things up.
"Neglect", by Carlyle Micklus
This one has a lot to do with the above one, because this one is also hot-glue, but shows a more gentle and delicate side to the medium.
glue, card, paint, plastic
40 x 30 x 20 cm
Vending Joy
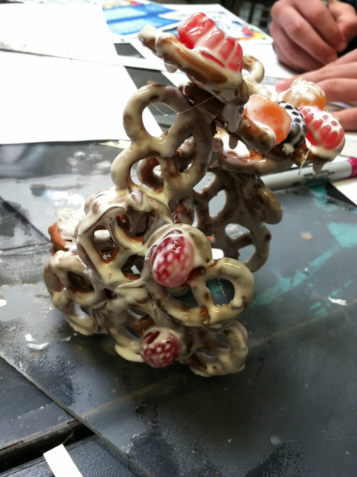
This is a new project. It is about using food from the vending machine and using the packaging and the food itself to create art. For instance, gluing pretzels together and making them into an interesting shape, and photocopying the packaging, and using the using the photocopy to make 3-D triangles and squares.
Here is what I have so far...this is an in-progress project... (I used gummy fruit snacks, pretzels, hot-glue, and elmer's glue)

Here is what I have so far...this is an in-progress project... (I used gummy fruit snacks, pretzels, hot-glue, and elmer's glue)

And this is after two more weeks:
Mike Kelley-Influenced Sculpture Update
Armature Update
Friday, February 3, 2012
Tribute to Mike Kelley
Today in sculpture class, out teacher informed us of the death of artist Mike Kelley (pictured below).
(To read about him, go here)
So, as a tribute to him, our class project was to construct a sculpture using different kinds of strings and wires, as well as stuffed animals. This is because Kelley sued stuffed animals in his own artwork.
We did our project, which was not planned out a whit, in our school's arts building, using two stories.
Kelley's work:

Class Work:
(To read about him, go here)
So, as a tribute to him, our class project was to construct a sculpture using different kinds of strings and wires, as well as stuffed animals. This is because Kelley sued stuffed animals in his own artwork.
We did our project, which was not planned out a whit, in our school's arts building, using two stories.
Kelley's work:

Class Work:
Sunday, January 29, 2012
Armature
Armature: Sculpture a framework to support the clay or other material used in modeling (Definition)
My armature, still in progress last time I posted about it...is still in progress. But here are more recent photos of it.
What we did was cut pieces of foam that fit the form of our profiles, then hot-glued them in, based on sharpie-drawn lines on our food-faces. Then, they pieces were trimmed more accurately, and chicken-wire was hot-glued onto the mold. Next, clay (that will be on the next post).

Subscribe to:
Comments (Atom)


